Why freeze cells “mid-action”?
Cells are constantly moving and changing: vesicles bud and fuse, proteins assemble and fall apart, filaments slide, and membranes reshape. If you try to image many of these processes with normal light microscopy, the motion blurs details or hides fleeting configurations. Freezing a cell in the middle of an event “locks” its molecules in place so scientists can examine the exact arrangement of proteins, membranes, or organelles at that moment—like taking a high-resolution photograph of a gymnast frozen in mid-flip.
Cryo-optical microscopy is the family of approaches that combines this freezing idea with fluorescence or other optical methods so researchers can capture the fluorescent signals that mark specific molecules, and then (often) follow up with even higher-resolution imaging (for example, electron microscopy) on the same frozen sample.
The central physical idea: vitrification vs ice crystals
Water is the main component of cells, and the way water freezes is everything in cryo-imaging.
- Ice crystals versus vitrification (glass-like solid): If water freezes slowly, it forms organized ice crystals that expand and can physically damage membranes and cellular architecture—this ruins the fine details scientists want to study. If water is cooled extremely rapidly or under special conditions, it can solidify into an amorphous, glass-like state called vitrification. Vitrified water holds molecules where they were without crystalline damage, preserving near-native structure.
- Why vitrification matters conceptually: Imagine freezing a living cell like taking a mold: slow freezing shatters the mold (ice crystals), whereas vitrification produces a faithful cast that preserves delicate arrangements. That makes vitrified samples ideal for studying cellular ultrastructure and for correlating fluorescence with high-resolution structural imaging.
How scientists conceptually freeze cells mid-action
There are different conceptual approaches depending on sample thickness and experimental needs. I’ll describe them at a high level—no procedural details.
- Rapid freezing for thin samples: For very thin layers of cells or samples placed on specialized supports, researchers use a method that cools the sample extremely quickly so the water vitrifies before crystals can form. This approach works best for thin or single-cell layers.
- High-pressure freezing for thicker samples: For thicker tissues or cell aggregates, scientists use methods that modify the physical conditions (for example, increasing pressure during cooling) so vitrification can occur more reliably at greater depths. Conceptually, raising pressure changes how water freezes and helps avoid crystal formation in thicker material.
- Optical/laser-triggered freezing: There are also approaches where the freeze is triggered very rapidly at a precise moment—useful when you need to capture a specific, short-lived event observed in real time. Conceptually, this is like having a very fast “pause” button that catches the cell exactly when you want.
- Cryo-transfer & storage: After vitrification, samples remain at very low temperatures to keep the glassy state. They are moved and stored in cold environments until imaging. Scientists use specialized cold stages and transfer devices to maintain the vitrified state during handling and imaging (again, handled only by trained personnel).
Preparing samples conceptually (what scientists think about)
Although I won’t provide procedural steps, it’s useful for students to understand the conceptual choices scientists make before freezing:
- Labeling the right molecules: Researchers often tag proteins with fluorescent labels (like fluorescent proteins or dyes) so those molecules can be seen under fluorescence microscopy. Choice of label affects brightness and behavior at low temperatures.
- Substrate & geometry: Samples are commonly grown on supports suited to low-temperature imaging and later to correlation with other imaging methods. The support must be compatible with both freezing and later imaging.
- Timing & triggering: To “freeze mid-action,” scientists plan experiments so the event they want to freeze either occurs at a predictable time (e.g., after adding a stimulus) or is observed live and frozen at the moment of interest.
- Fiducial markers for correlation: Small, visible markers are often placed on or near the sample so images from different microscopes (optical and electron) can be aligned later. Think of these as landmarks on a map to help match two different views of the same area.
What cryo-optical microscopes are like (conceptually)
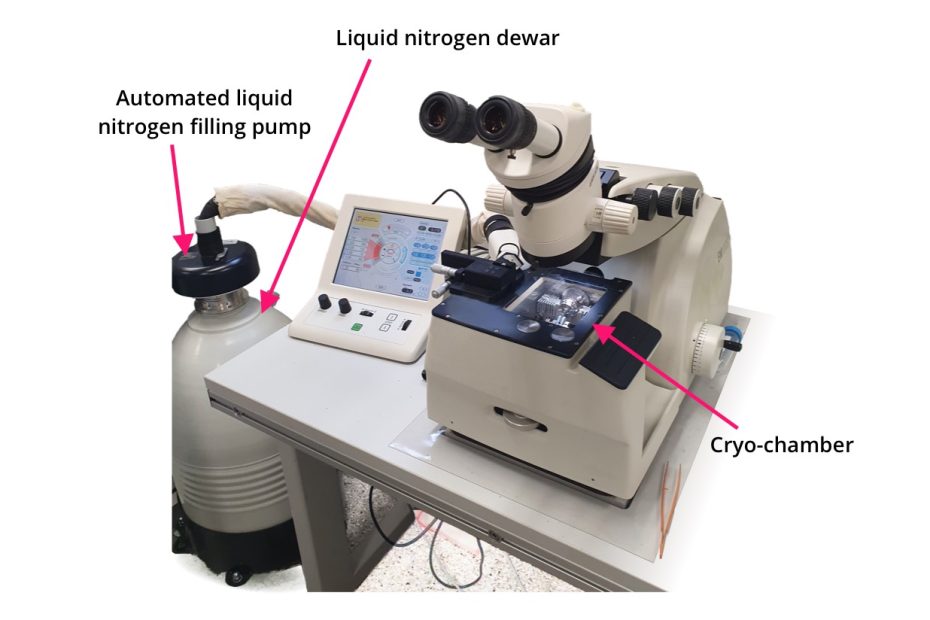
A cryo-optical microscope is a fluorescence or optical microscope that has been adapted to keep a vitrified sample cold while imaging. Key ideas:
- Cold stage: The sample sits on a stage that maintains very low temperature. That stage must minimize thermal gradients and mechanical drift, and it must let light in and out cleanly.
- Optics adapted for cold: Standard immersion oils and objectives used at room temperature are not suitable at cryo temperatures; scientists use specially designed optics and approaches to collect fluorescence from a cold, vitrified sample.
- Illumination & detection: Lasers or LEDs excite fluorescent labels and sensitive detectors (like modern cameras) collect the emitted light. At cryo temperatures, fluorophores often behave differently—sometimes brighter and more stable, sometimes shifted in color—so scientists interpret the signals with those differences in mind.
Imaging modes used with cryo-optical methods (what each gives you)
- Widefield fluorescence: Gives a general view of where labeled molecules are across a cell. Quick and good for locating features of interest.
- Confocal fluorescence: Uses focused light to get optical sectioning (slices) through the sample, which helps reduce background and improves contrast in 3D.
- Super-resolution optical methods (conceptually): Techniques that beat the classical diffraction limit provide finer spatial detail of fluorescently labeled molecules. Some super-resolution methods can be adapted to cryo samples to reveal very small structures marked by fluorescence.
- Correlative Light and Electron Microscopy (cryo-CLEM): This two-step conceptual workflow pairs fluorescence (which tells you where specific molecules are) with electron microscopy (which shows the fine structural details). First you detect the fluorescent signals at cryo temperatures, then you image the same locations with an electron microscope to overlay molecular identity onto ultrastructure.
Advantages of freezing cells for imaging
- Capture transient states: You can preserve rare or fast events for detailed inspection.
- Preservation of native hydration: Vitrification keeps the cell’s water and molecules where they were without chemical fixation artifacts.
- Reduced motion: Molecular motion stops, enabling longer exposures and higher-resolution imaging.
- Better signal stability: Many fluorescent probes are less prone to rapid photobleaching at low temperatures, allowing more repeat imaging of the same spot.
- Perfect for correlation: Vitrified samples bridge optical and electron microscopy so molecular labels can be pinned to ultrastructural context.
Limitations and artifacts to watch for
- Freezing artifacts: If vitrification is not achieved everywhere, ice crystals can appear and distort structures—this is why vitrification quality is central to good results.
- Altered fluorophore behavior: Fluorescent labels may shift in brightness or spectrum at low temperatures; interpretation must account for that.
- No “live” imaging after freezing: Once frozen, you can’t watch the event continue—cryo methods capture moments, not movies.
- Optical challenges: Low temperatures change refractive indices and can introduce optical aberrations; specialized optics and careful calibration are needed.
- Throughput and accessibility: Cryo workflows require specialized infrastructure and trained operators, so they are less common than standard light-microscopy methods.
How data are interpreted conceptually
- Overlaying maps: Scientists align fluorescent maps (which show molecular identity) with high-resolution structural maps to infer how labeled molecules are arranged relative to membranes, filaments, or organelles.
- 3D reconstruction: By collecting optical sections or electron tomograms, researchers can reconstruct the 3D arrangement of structures and tagged molecules.
- Comparative analysis: Multiple snapshots (from many cells frozen at different times or after different triggers) let scientists build a sequence of likely steps in a process—like frames in a flipbook assembled from frozen moments.
Safety, ethics, and training
Because cryo-imaging involves extreme cold, biological samples, and specialized instruments, it must be done in properly equipped facilities by trained staff under institutional biosafety and cryogen safety rules. If you’re a student curious about these methods, the safe paths are:
- Ask to visit a university core facility or a research lab that performs cryo-microscopy under supervision.
- Attend workshops, webinars, and public lectures from microscopy centers or scientific societies.
- Work with your teacher to analyze publicly available cryo-datasets or curated image galleries rather than attempting hands-on freezing experiments outside certified labs.
Classroom-friendly ways to learn the ideas (safe activities)
Here are safe, non-procedural activities that help students understand the principles without any hazardous lab work:
- Image-interpretation exercises: Use public legacy datasets or published cryo images (many research groups and institutions publish gallery images) and practice mapping fluorescent signals to structure.
- Simulations and animations: Watch animations of vitrification, molecular diffusion, and correlative microscopy to build intuitive understanding.
- Compare “fixed” vs “vitrified” images conceptually: Study and discuss the conceptual differences between chemical fixation (a common classroom topic) and vitrification in terms of artifacts and preservation.
- Design thought experiments: Ask students to plan, conceptually, how they would “capture” a protein assembling on a membrane—what labels would they want, what imaging goals, and what trade-offs exist (resolution vs molecular specificity).
Glossary (short, clear definitions)
- Vitrification: The rapid transformation of water into an amorphous, glass-like solid without forming ice crystals.
- Cryo-fixation: Freezing a biological sample quickly enough to preserve its native structure.
- Cryo-optical microscopy: Fluorescence or other light-based microscopy performed on vitrified samples kept at very low temperature.
- Cryo-CLEM: Cryogenic correlative light and electron microscopy—combining cryo-fluorescence with cryo-electron imaging to link molecular identity and ultrastructure.
- Fiducials: Small, visible markers used to align images from different microscopes.
- Cryo-stage: A cooled platform that holds vitrified samples at low temperature during imaging.
- Super-resolution: Optical techniques that achieve spatial resolution beyond the classical diffraction limit of light.
Final thoughts
Freezing living cells in mid-action and imaging them with cryo-optical microscopy is one of the most powerful conceptual tools modern cell biologists have for connecting molecules to structure. It’s a blend of physics (how to control water and temperature), chemistry (how labels behave), and biology (what cellular processes you want to see). While the practical work requires specialized equipment and training, a high school student can gain deep understanding by studying the principles, interpreting real cryo images, and visiting microscopy facilities or following reputable online courses and webinars.